Examples
Practical step-by-step examples for creating pipelines and action plans.
This page provides practical, end-to-end examples showing how to build and use pipelines and action plans in BIION-D.
Example 1: Simple Anomaly Detection Pipeline
A basic pipeline that captures an image and runs anomaly detection.
Scenario
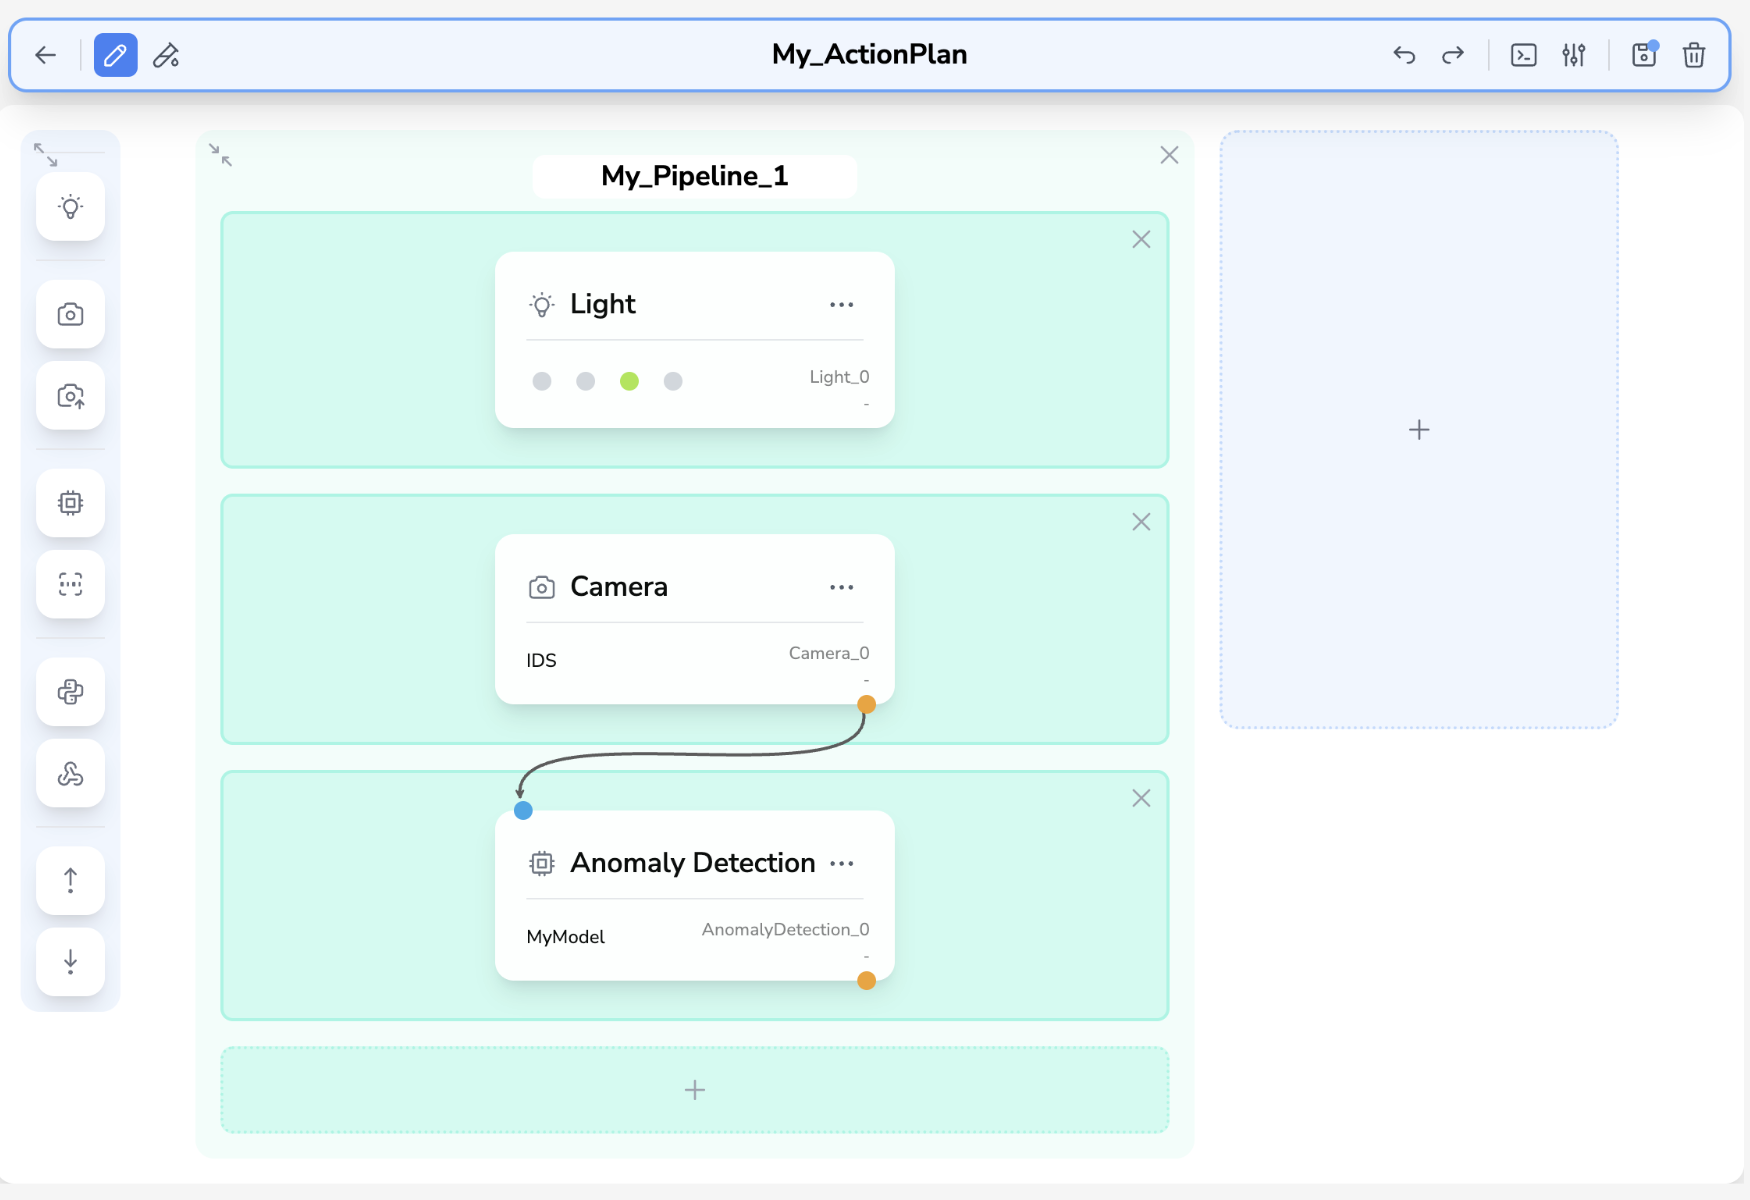
You have one camera (IDS), a light, and one anomaly detection model (MyModel). You want to inspect products for surface defects.
Pipeline Structure
How to Use
Create the Workspace
Go to the Workspace page and click Create. Name it “Surface Inspection”.
Create the Action Plan
Click the + card to create a new action plan. Select the Anomaly detection template or start from Empty. Name it “My_ActionPlan”.
Configure the Pipeline
Open the action plan and switch to Edit mode. Add a Light module in Block 0. Add a Camera module in Block 1 and select IDS. Add an Anomaly Detection module in Block 2 and select MyModel as the model, with Camera_0.frame as the input image.
Data Collection (Acquisition)
Go to the Run page, switch to Acquisition mode and run the pipeline repeatedly to collect training images. The images are saved to MyModel’s dataset.
Inference
After training the model, switch to Inference mode on the Run page. Each execution now returns a compliance result: Good, Uncertain or Defected.
Example 2: Multi-Camera pipeline with Lighting
A pipeline that controls lights and captures images from two different cameras.
Scenario
You have two cameras (IDS and 4103822175), a light, and two inference models (MyModel for anomaly detection and MyObjModel for object detection). You want to light the product, capture two images, and run both models.
Pipeline Structure
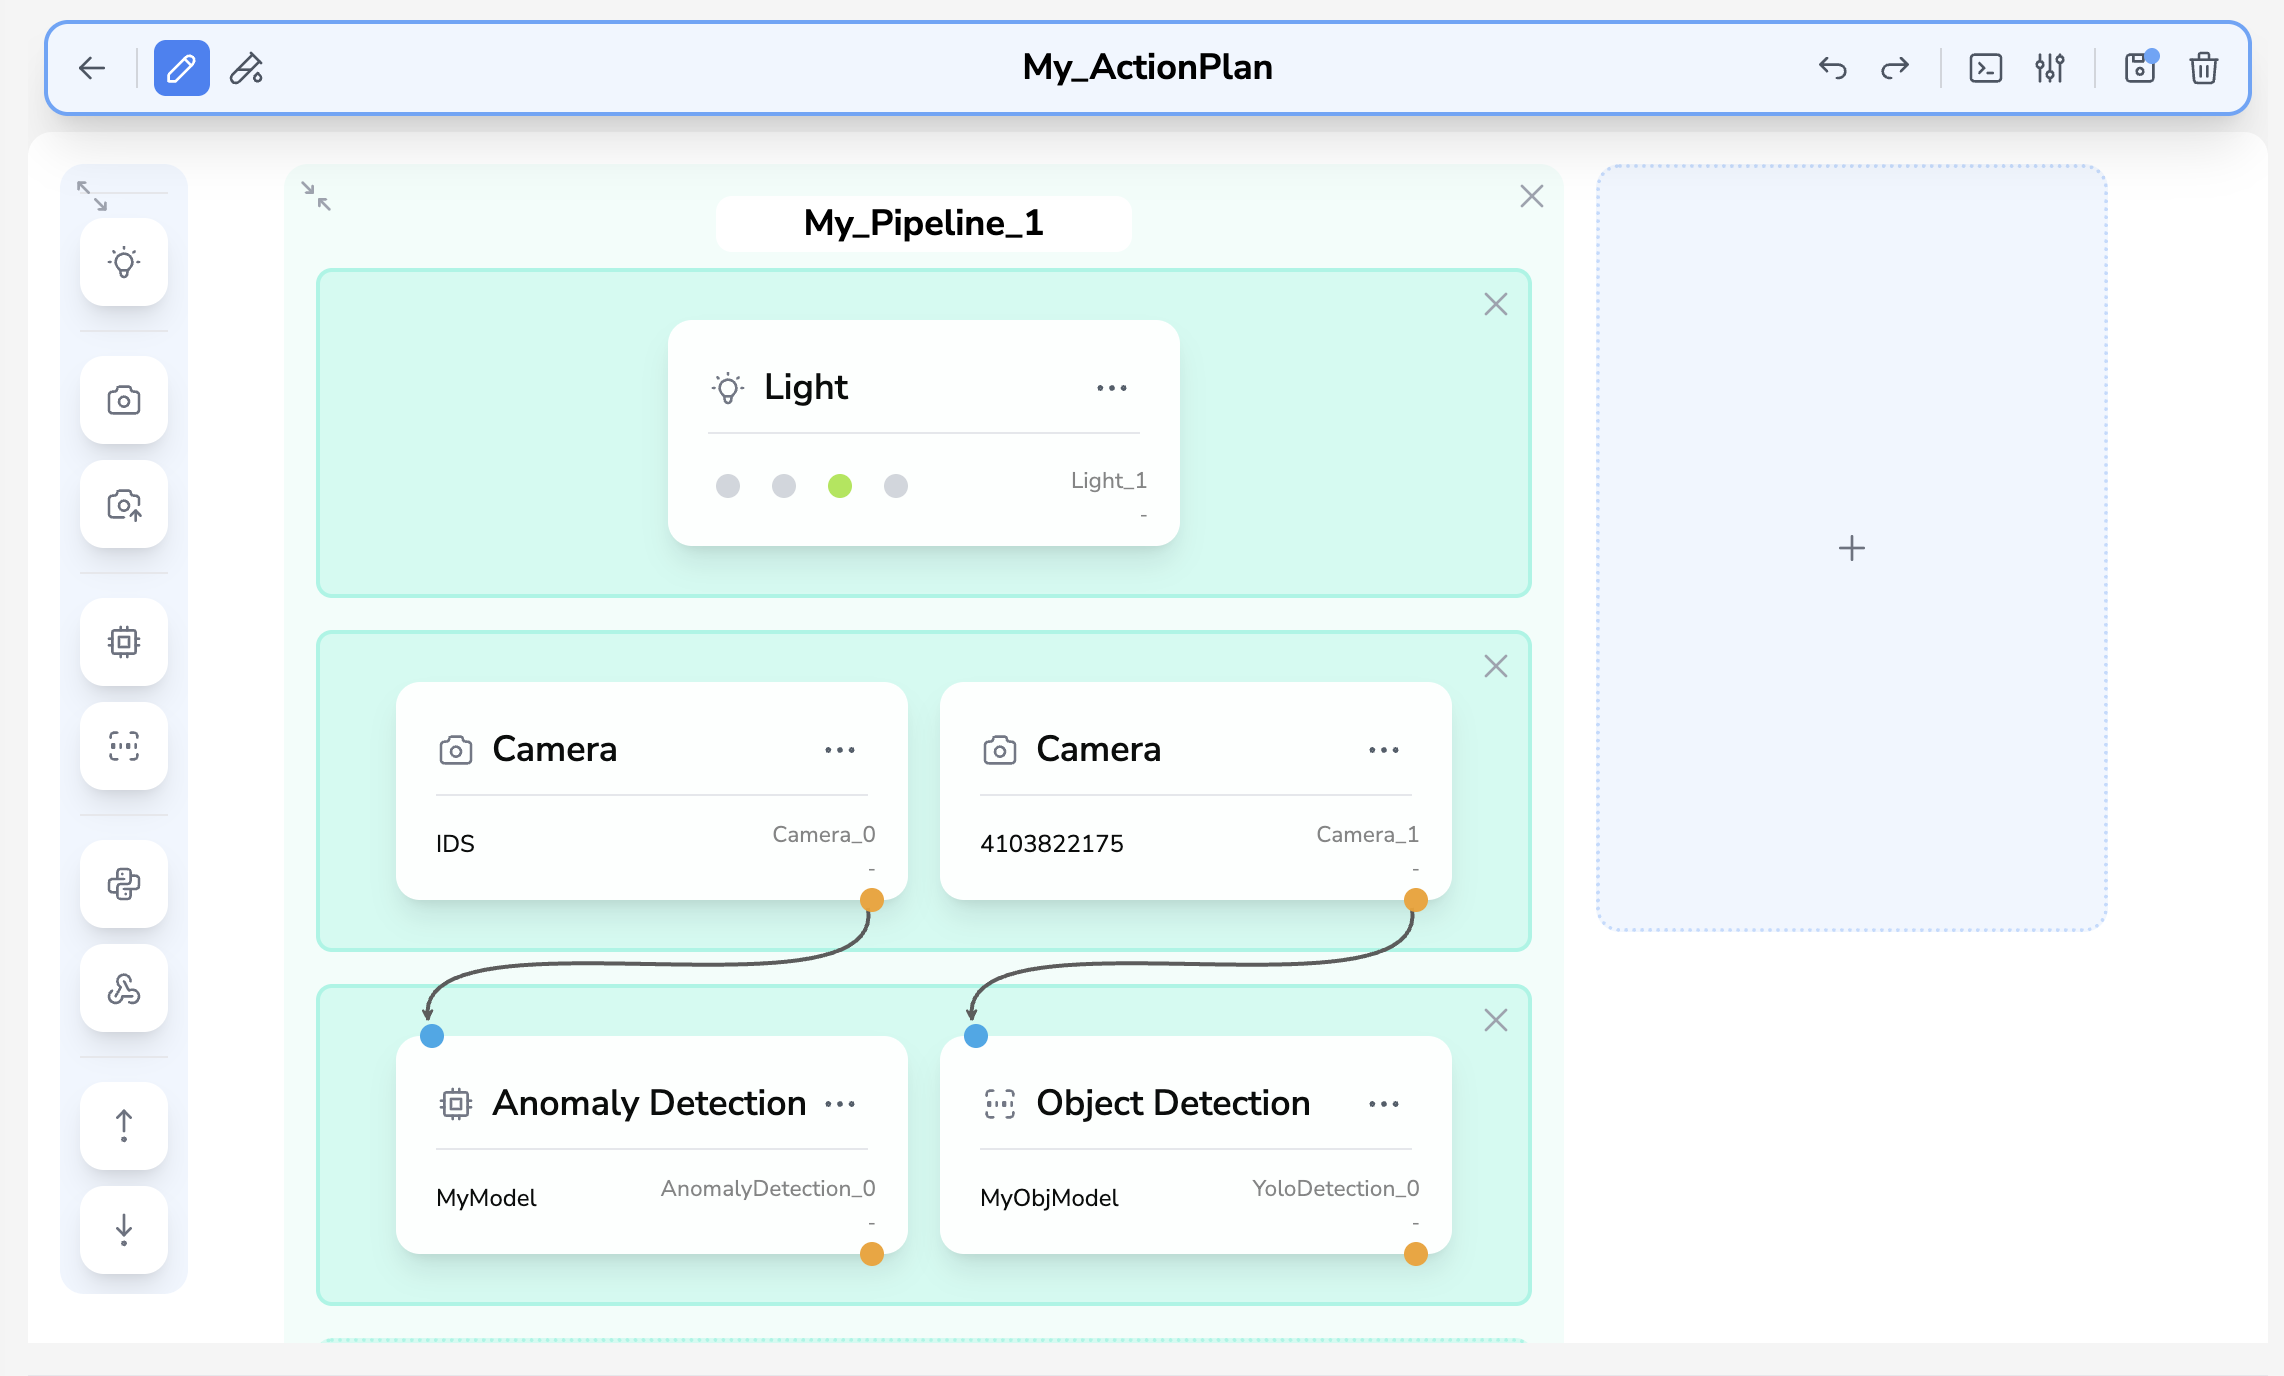
The two cameras are in the same block (Block 1) so they capture simultaneously. This is allowed because they use different camera labels. The two inference modules (Anomaly Detection and Object Detection) are also in the same block (Block 2) and run in parallel.
Example 3: Pipeline with PLC Integration
A pipeline that reads a part ID from the PLC, inspects the product, and writes the result back.
Scenario
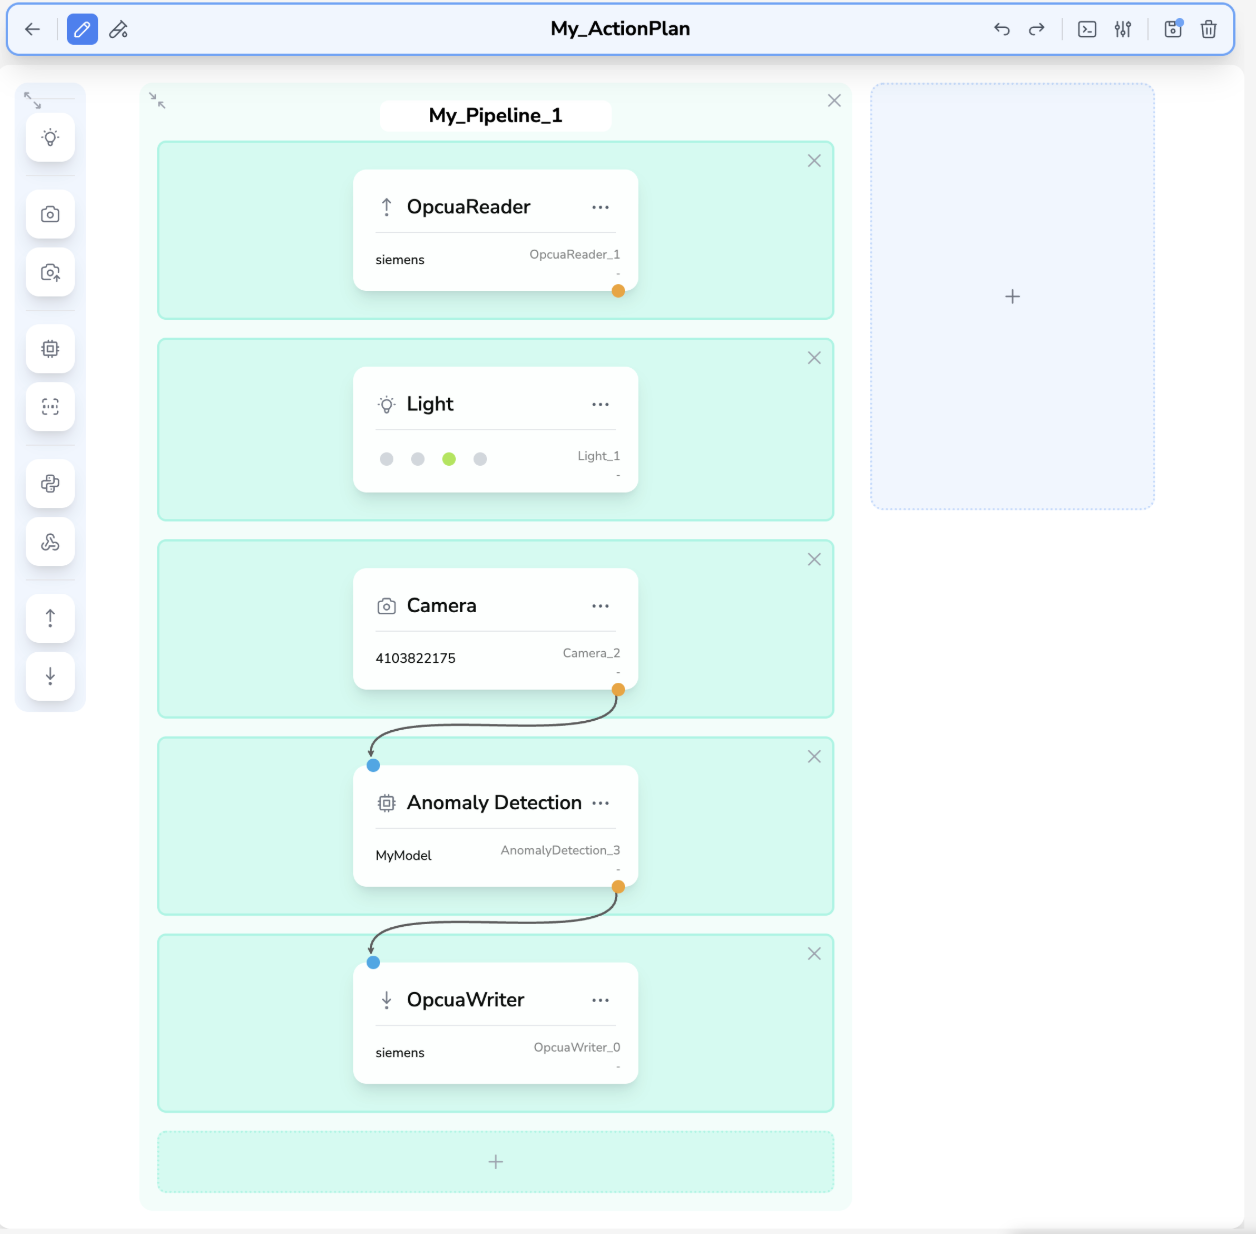
Your PLC exposes a PartID node and an InspectionResult node. You want to read the part ID before inspection and write back the compliance result.
Pipeline Structure
Example 4: Custom Script with Webhook Notification
A pipeline that uses a Python script for custom post-processing and a webhook to notify an external system.
Scenario
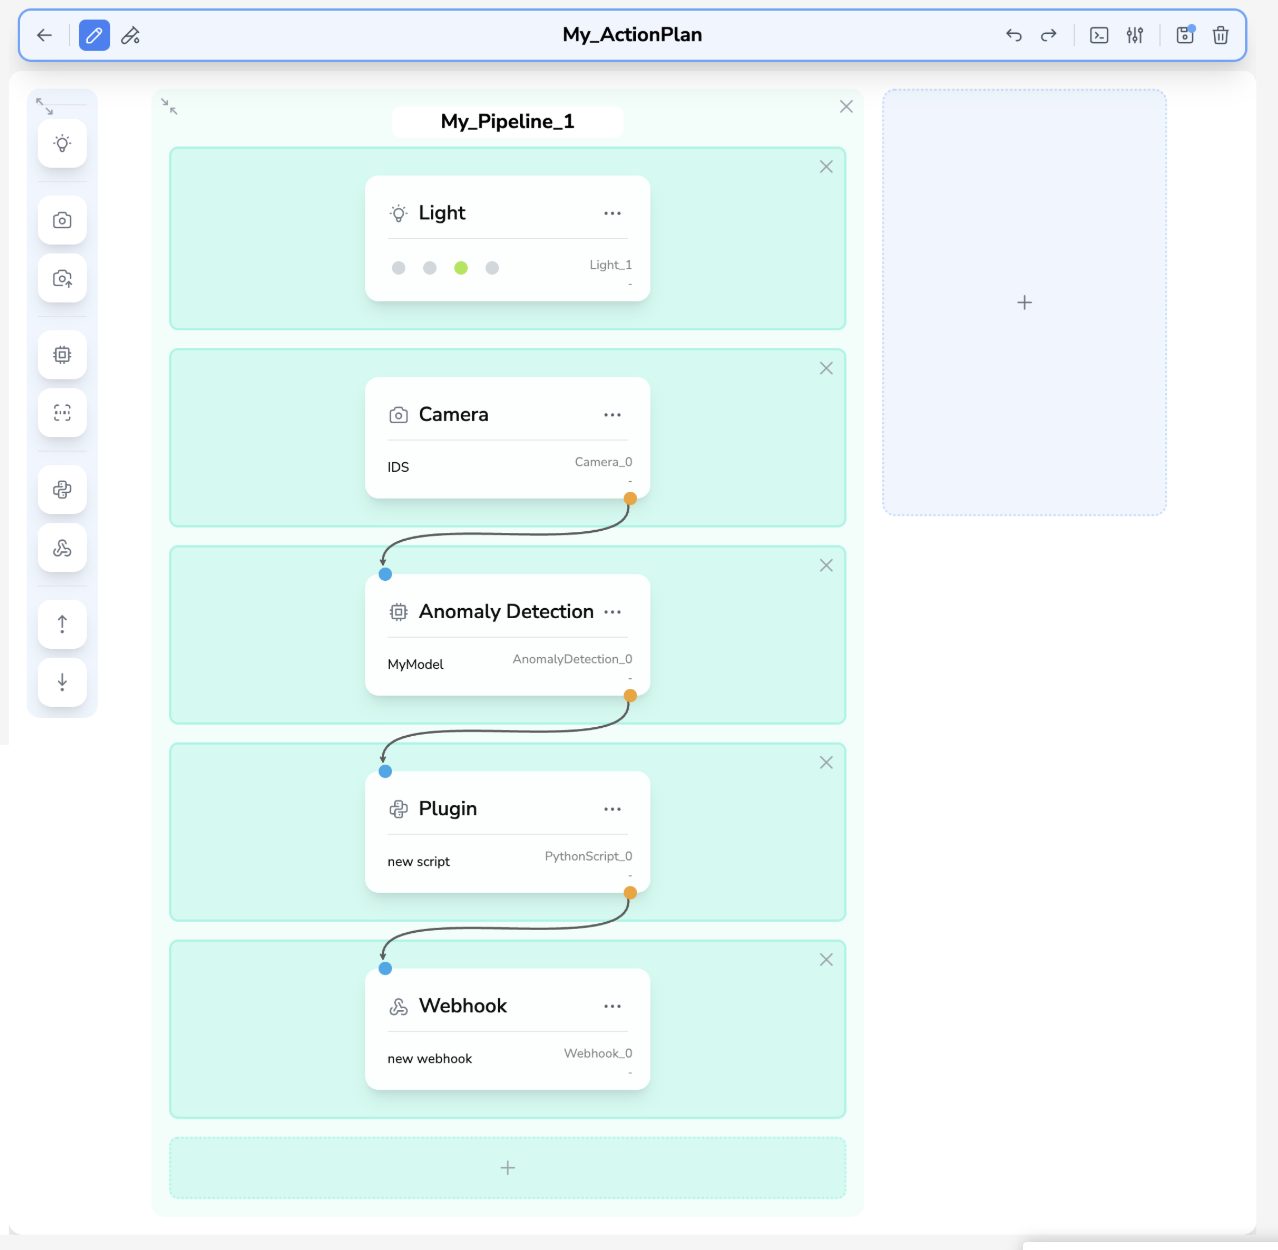
After anomaly detection, you want to apply custom business logic (combine the anomaly score with a PLC value) and send the final result to an external MES system.
Pipeline Structure
Python Script Code Example
# Read results from previous modules
score = Data.get("anomaly_0.pred_score")
part_id = Data.get("opcua_reader_0.value")

# Custom business logic
if score < 0.3:
    quality_grade = "A"
    compliance = 0
elif score < 0.6:
    quality_grade = "B"
    compliance = 1
else:
    quality_grade = "C"
    compliance = 2

# Export results for downstream modules and history
Data.export("quality_grade", quality_grade)
Data.export("part_id", part_id)
Data.set_compliance(compliance)

print(f"Part {part_id}: Grade {quality_grade} (score: {score:.3f})")
Example 5: Multi-Pipeline Action Plan
An action plan with two separate pipelines that inspect different aspects of the same product.
Scenario
You inspect a product from two perspectives: a surface check and a dimensional check. Each has its own camera and model. The overall result is the worst compliance from both.
Action Plan Structure
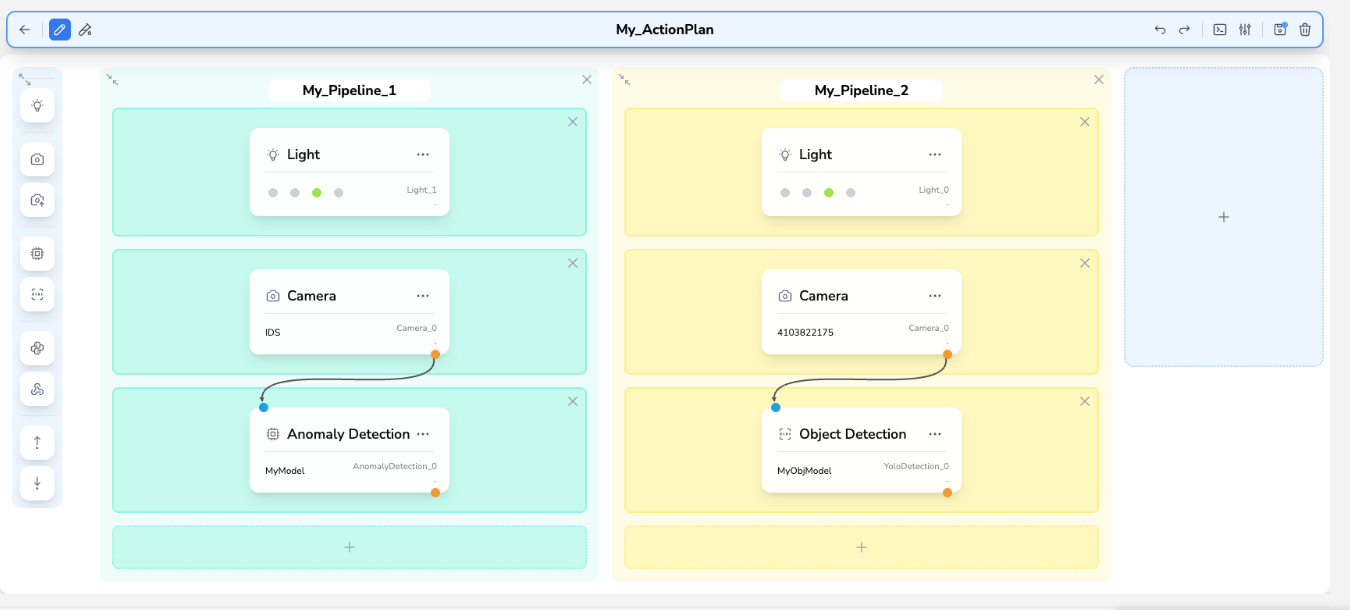
Execution Flow
Activate the Action Plan
On the Workspace page, click ⋯ → Activate on the My_ActionPlan card.
Run Pipelines
On the Run page, each pipeline appears with its own Run button. Execute them one at a time:
- Click Run on
My_Pipeline_1→ results appear inline - Click Run on
My_Pipeline_2→ results appear inline
Aggregation
After both pipelines complete, the system aggregates the compliance results. The overall compliance is the worst value across both pipelines (BAD_UNC_GOOD logic).
Review
The aggregated result is displayed on the Run page. You can also find it in the History page.
Example 6: Object Detection + Crop + Anomaly Detection
A pipeline that detects an object, crops the image around it using a Plugin, and then runs anomaly detection on the cropped region.
Scenario
You have a camera (IDS) and a light. On the production line, each product can be in a different position within the frame. You want to:
- Detect the product using an Object Detection model.
- Crop the original image around the detected bounding box, so that only the product region is isolated.
- Analyze the cropped image with an anomaly detection model to check for surface defects.
This approach makes anomaly detection more reliable because the model always receives a tightly framed image of the product, regardless of where it appeared in the original capture.
Pipeline Structure
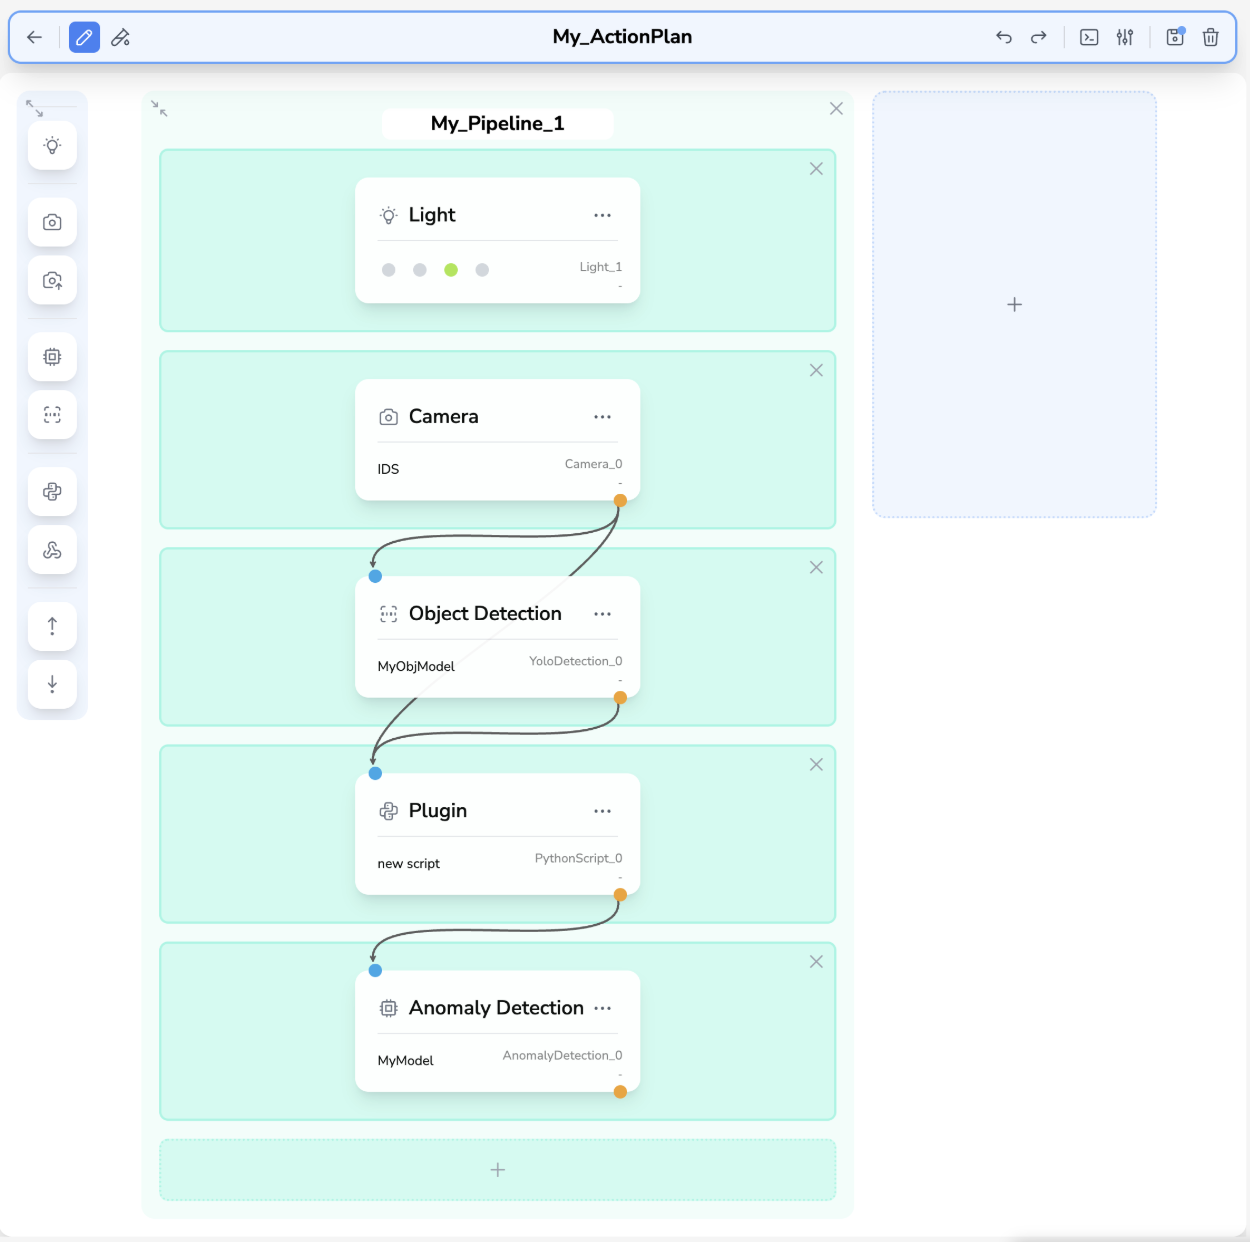
Workflow Description
Block 0 — Lighting
The Light module activates the light to ensure consistent illumination before capture.
Block 1 — Image Capture
The Camera module captures a full-frame image from IDS. The image is stored as Camera_0.frame in the data registry.
Block 2 — Object Detection
The ObjectDetection module runs the MyObjModel model on Camera_0.frame. Its list of classes, confidence values and boxes is stored as ObjectDetection_0.detected.
Block 3 — Crop via Plugin
The PythonScript module, shown as Plugin in the UI, reads the detections and original image. It crops the first detected object and exports PythonScript_0.cropped_frame for the next block.
Block 4 — Anomaly Detection on Cropped Image
The AnomalyDetection module receives PythonScript_0.cropped_frame as input and runs the MyModel anomaly model on it. Because the image is already tightly cropped around the product, the anomaly model can focus entirely on surface quality without background noise.
Python Script Code Example
# Get the original image and object detections
frame = Data.get("Camera_0.frame")
detections = Data.get("ObjectDetection_0.detected")

# Each item in `detected` is an annotation with `class`, `confidence`, and `box`.
if detections:
    annotation = detections[0]
    box = annotation["box"]

    # Use all four vertices so the crop also works with oriented bounding boxes.
    x_values = (box["x1"], box["x2"], box["x3"], box["x4"])
    y_values = (box["y1"], box["y2"], box["y3"], box["y4"])
    height, width = frame.shape[:2]
    x1 = max(0, int(min(x_values)))
    y1 = max(0, int(min(y_values)))
    x2 = min(width, int(max(x_values)))
    y2 = min(height, int(max(y_values)))

    cropped = frame[y1:y2, x1:x2]
    Data.export("cropped_frame", cropped)
    print(f"Cropped region: ({x1},{y1}) -> ({x2},{y2}), shape: {cropped.shape}")
else:
    # No detection: pass the full image as fallback
    Data.export("cropped_frame", frame)
    print("No object detected, using full frame as fallback")
The key technique is chaining Object Detection → Plugin → Anomaly Detection. The Plugin reads the detection output, crops the original image and exports the cropped result for the anomaly model.
Common Patterns Summary
| Pattern | When to Use |
|---|---|
| Light → Camera → Inferencer | Standard inspection with controlled lighting |
| OpcuaReader → Camera → Inferencer → OpcuaWriter | Full PLC-integrated inspection loop |
| Camera → Inferencer → Plugin | Custom post-processing after AI inference |
| Camera → Inferencer → Webhook | Notify external systems of inspection results |
| Multiple cameras in same block | Multi-angle simultaneous capture |
| Multiple inferencers in same block | Parallel AI analysis on different images |
| Camera → Object Detection → Plugin → Anomaly Detection | Localize an object, then inspect the cropped region |
Tips & Best Practices
Tip 1: Block ordering matters. Always place lights before cameras, and cameras before inferencers. The data must flow from producers to consumers.
Tip 2: Test both execution modes. Acquisition collects dataset images, while Inference produces inspection results. Confirm that downstream modules receive the outputs they expect in the selected mode.
Tip 3: Keep pipelines focused. If two inspections are independent (different cameras, different models), consider using two separate pipelines in the same action plan. This makes them easier to test individually.